If you have been following my blog for a while, you will remember that I posted a blog about Pocket Letters not too long ago (which I will link to HERE). However, that blog entry was more of an introduction to Pocket Letters, where they originated, what they are, and what to put in them. Since that time, I have received some requests to put out a Pocket Letter process video – showing step-by-step how to make a Pocket Letter.
You will find my easy-to-follow video below as well as supplies used. I hope this is helpful, but please let me know in the comments if you have any questions. Happy crafting!
*FTC Disclosure: This post contains affiliate links and I will be compensated if you make a purchase after clicking on my links at no additional cost to you.
Pocket Letters have gained much popularity in the crafting world recently – and so, I thought it would be fun to go over Pocket Letter basics and share some ideas. For starters, the original idea for Pocket Letters began with crafter and YouTuber Janette Lane. You can find more great ideas at her website HERE.
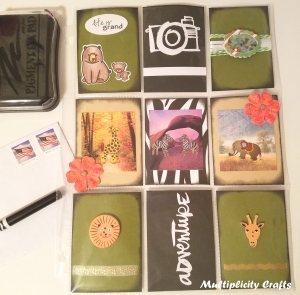
Pocket Letters are a tidy, fun, creative way to share pen pal letters and “goodies” such as stickers, recipes, washi tape samples and other fun crafty items! Of course, it isn’t only limited to crafters, but tends to make more sense when taking part in a craft swap where you exchange Pocket Letters with a pen pal. There are craft swap groups on Facebook as well as Janette Lane’s website if you are interested in finding Pocket Letter pen pals.
The Basics:
The base of the Pocket Letter is simply a 9-slot baseball card holder sheet. I found mine at an office supply store, but you can find them at other places and online (see highlighted link above).
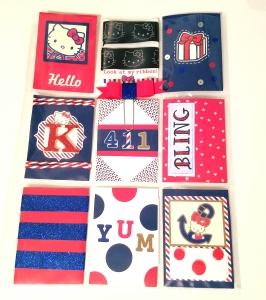
Usually Pocket Letters will follow a theme such as a color, character, event, holiday, or seasonal theme. This helps to inspire ideas to get you started. Some people decorate the front and back of their pocket letters. Personally, I just decorate the front – but it’s up to you. I decorate by inserting small cards of decorated cardstock into each panel. I have a sample template card to cut my 9 cardstock panels from.
Trace template 9 times with a pencil onto back of cardstock and cut out for Pocket Letter panel inserts.
The Goodies:
After you have your Pocket Letter made and decorated, it’s time to insert some “goodies” behind each panel! This is where it can get really fun! There are many ideas of things you could include depending upon the theme and who will be receiving the Pocket Letter. Below, I have listed some ideas of things you could include:
About Me – Note Recipe StickersSequinsProject Life CardsMini NotepadsGemstones
Your Business CardDie CutsHot Tea/Cocoa PacketMagazine ClippingsPoem
Shaped or Decorated Paperclips Mini EnvelopesGift TagsGift CardWashi Tape Samples
Baker’s Twine Samples Buttons Ribbon samplesKeychain with CharmsCoupons
Flat Makeup Samples Perfume Samples from Magazines Photos of Pets Flat Wrapped Gum/Candy
Extra Cardstock cards cut to PL size for your recipient’s next Pocket Letter Mini Nail File
Decorative Magnets or Small Magnetic BookmarksSmall Chipboard Cut-Outs Enamel Dots
Packet of Flower Seeds Scented Sachet Cards/BagsHair Ties/BarettesCustom Gift Labels
Hand-Tied Bow AssortmentCustom Address Labels Mini Paper Banner Fabric Samples
Paint Chip Samples for CraftingSmall Baggy of GlitterHandmade JewelryHandmade Zipper Pulls
To see a video of my very first Pocket Letter, check out the video posted below!
I HOPE THIS WAS HELPFUL!
PLEASE FEEL FREE TO SHARE THIS POST!
ALSO, DON’T FORGET TO CHECK OUT MY GIVEAWAYS & MORE PAGE HERE.
*FTC Disclosure: This post contains affiliate links and I will be compensated if you make a purchase after clicking on my links at no additional cost to you.