In today’s beginner-friendly video, I will show you a super easy way to make a flower using the paper quilling technique. There are such few tools needed and all of the tools you will need are very affordable! A great craft if you are limited on space or funds – but gives results that make you say, “Wow!!” Paper quilled pieces are usually sturdy enough to mail without getting crushed, also… so that’s a major perk! To see the supplies needed and the tutorial video, scroll down a bit. Everything you need to know is there for you. Thanks for stopping by today! Have fun paper quilling!!
Today’s project is perfect for the Wintertime and the upcoming Christmas season! We will be constructing a large paper rose – with bling, of course! We will place this beauty inside of a clear globe ornament, add a string & bow, and have a beautiful keepsake for years to come! Makes a wonderful gift for family or friends!
Begin with 3 pieces of 65lb. red cardstock cut at 8×8″. Fold in triangles 3 times. (Please note: I have a companion video for this and it will make more sense once seeing it done). After folding, cut a half of a heart shape on all three folded pieces of red cardstock. On the first piece of red cardstock, cut away 1 petal. On the second piece of red cardstock, cut away 2 petals (keeping them joined). And on the third piece of red cardstock, cut away 3 petals (keeping them joined). You will keep all petals, even the ones you cut away. Connect each individual set of petals into a round shape by gluing them together. When finished, glue into place in size order. Embellish as desired. Complete this project by placing your winter rose inside of a clear globe ormanent with a bed of “snow” at the bottom. Add Baker’s Twine or ribbon to create a hanger.
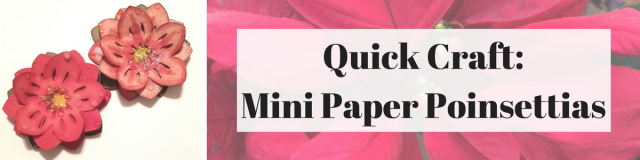
‘Tis the season to begin thinking about Christmas… and that means lots of fun crafts to make! In today’s blog, we’ll be making quick, cute mini paper Poinsettias! I actually won a giveaway where I received these cute paper flowers. But, I wanted to do something Christmas-themed with them… so, that was the inspiration for the Poinsettias!
I will have all of the products linked below that I used, as well as an instructional video. Some of the items are optional. Leave your flower sweet and simple or use lots of bling to jazz it up… the choice is yours!
The short video tutorial at the end of this blog entry will give you very easy step-by-step instructions. This craft is suitable for kids, beginners, or any level of crafter! Also, there are so many different ways you could use these cute mini Poinsettias. You could use them on cards, scrapbook pages, as paper clip toppers, or gifts. You could even use them as Christmas tree garland by hot gluing them onto a string, twine, or ribbon! Create them in a variety of shapes and colors… the possibilities are endless with a creative mind!
Please enjoy the video below ↓ ↓ ↓
*FTC Disclosure: This post contains affiliate links and I will be compensated a percentage if you make a purchase after clicking on my links, at no additional cost to you. Your name/information will not be visible to me. I appreciate your support.